Quick Start Guide
Strapi offers a lot of flexibility. Whether you want to go fast and quickly see the final result, or would rather dive deeper into the product, we got you covered. For this tutorial, we'll go for the DIY approach and build a project and data structure from scratch, then deploy your project to Strapi Cloud to add data from there.
Estimated completion time: 5-10 minutes
☑️ Prerequisites:
Before installing Strapi, the following requirements must be installed on your computer:
- Node.js: Only Active LTS or Maintenance LTS versions are supported (currently
v18andv20). Odd-number releases of Node, known as "current" versions of Node.js, are not supported (e.g. v19, v21). - Your preferred Node.js package manager:
- Python (if using a SQLite database)
You will also need to install git and to have a GitHub account to deploy your project to Strapi Cloud.
🚀 Part A: Create a new project with Strapi
We will first create a new Strapi project on your machine by running a command in the terminal, and then register our first local administrator user.
Step 1: Run the installation script and create a Strapi Cloud account
Step 1: Run the installation script and create a Strapi Cloud account
Run the following command in a terminal:
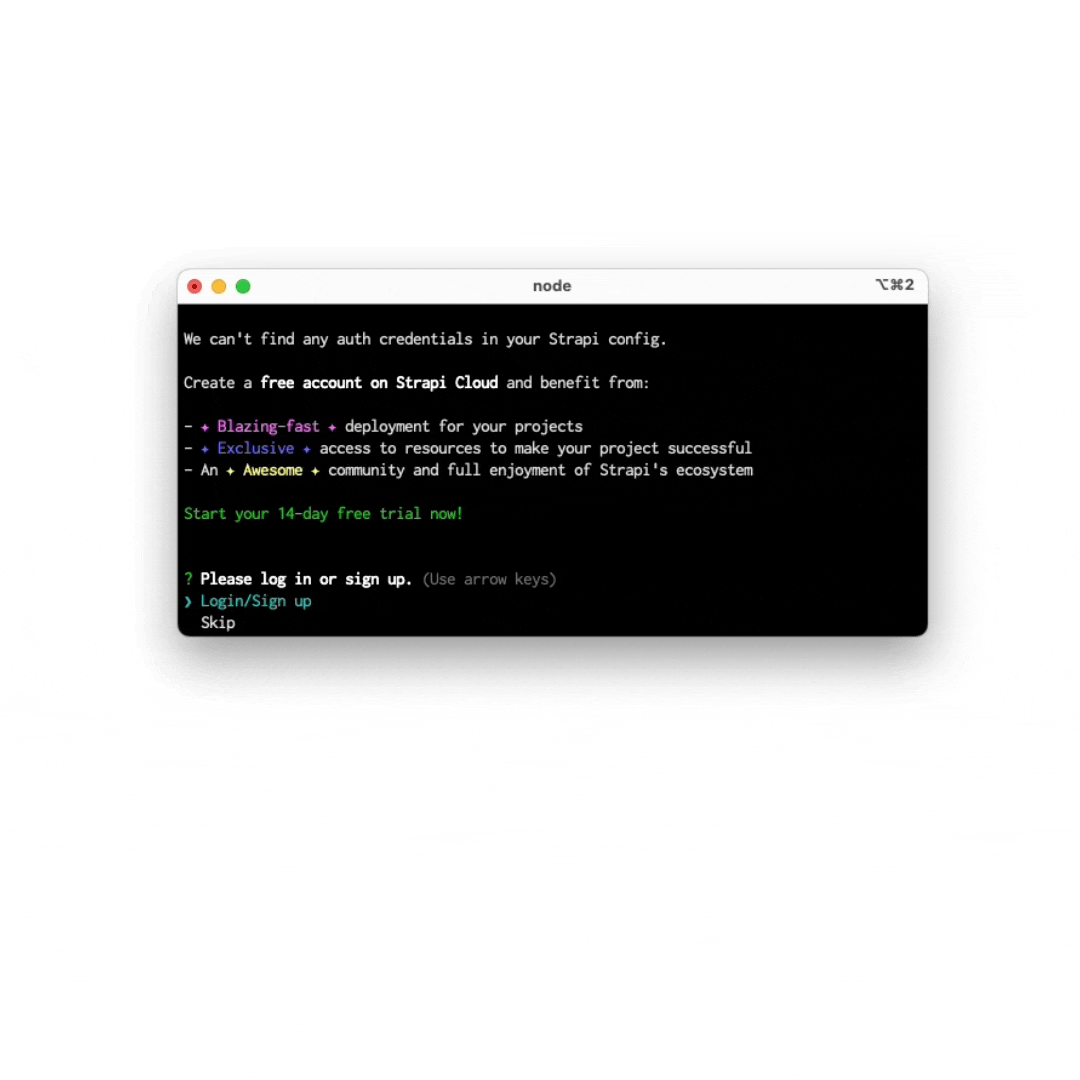
npx create-strapi@latest my-strapi-projectThe terminal will invite you to create a Strapi Cloud account and start a free, 14-day trial. Ensure
Login/Sign upis selected in the terminal, or use arrow keys to select it, and press Enter.In the new browser tab that opens, ensure the confirmation code is the same as in the terminal and click Confirm.
Still in the browser tab, click Continue with GitHub. If you are not already logged in into GitHub with your current browser session, you might be redirected to a GitHub login page.
Once logged in, the browser will display a "Congratulations, you're all set!" message and you can safely close the browser tab and get back to the terminal.
The terminal will now ask you a few questions. Press
Enterto accept the default answer to all questions.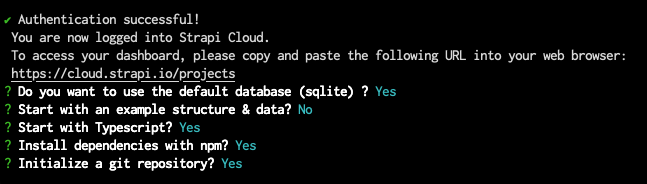
As you will see in the terminal, your project is now building locally.
- The folder of your project will include a
.strapi-cloud.jsonfile used to link the local Strapi project on your machine to the Strapi Cloud project. - Many more installation options are available. Please refer to the installation documentation for details.
Step 2: Register the first local administrator user
Step 2: Register the first local administrator user
Once the installation is complete, you need to start the server. In the terminal, type cd my-strapi-project && yarn develop and your browser automatically opens a new tab.
As long as you stay in the my-strapi-project folder, you will just need to run yarn develop any time you want to start the Strapi server again.
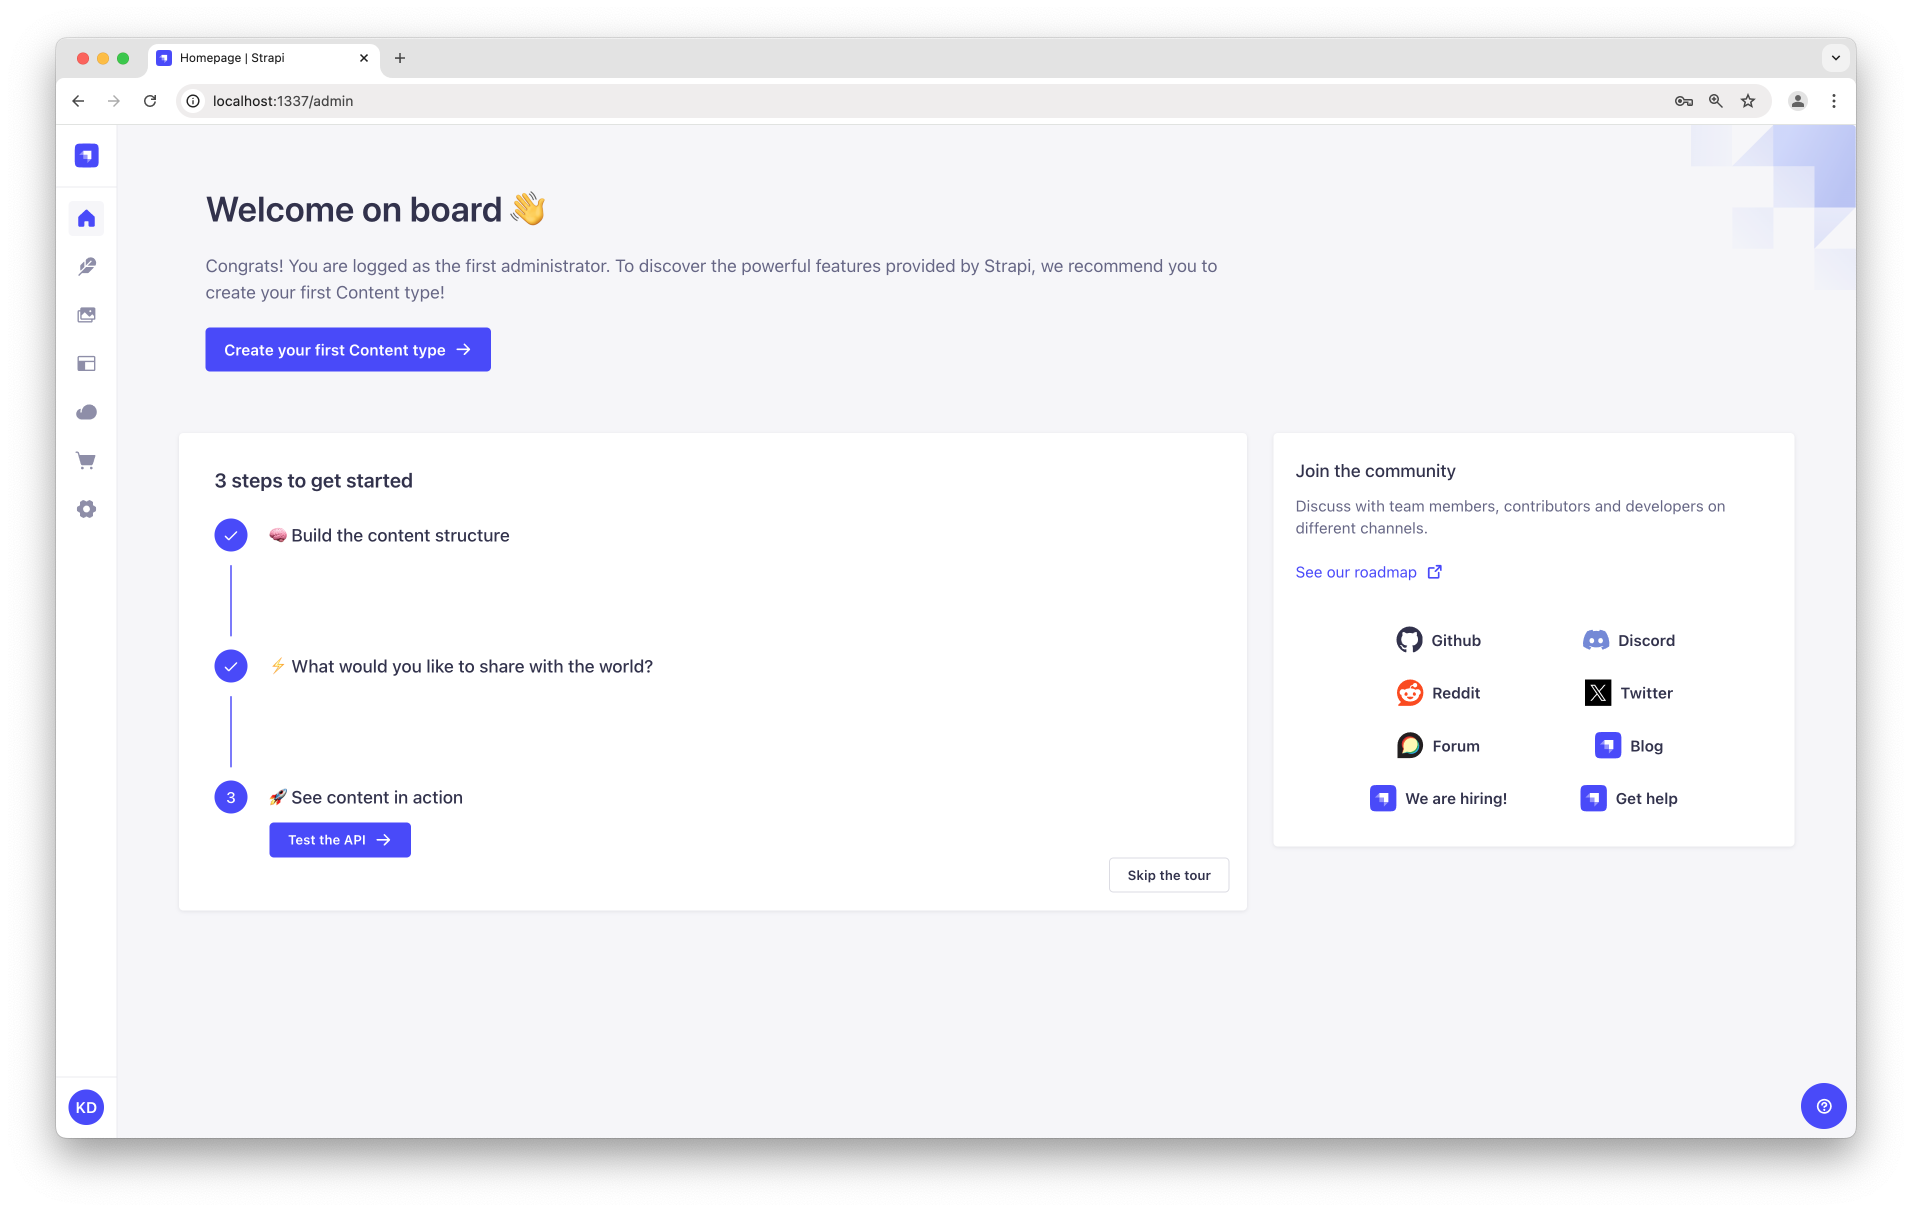
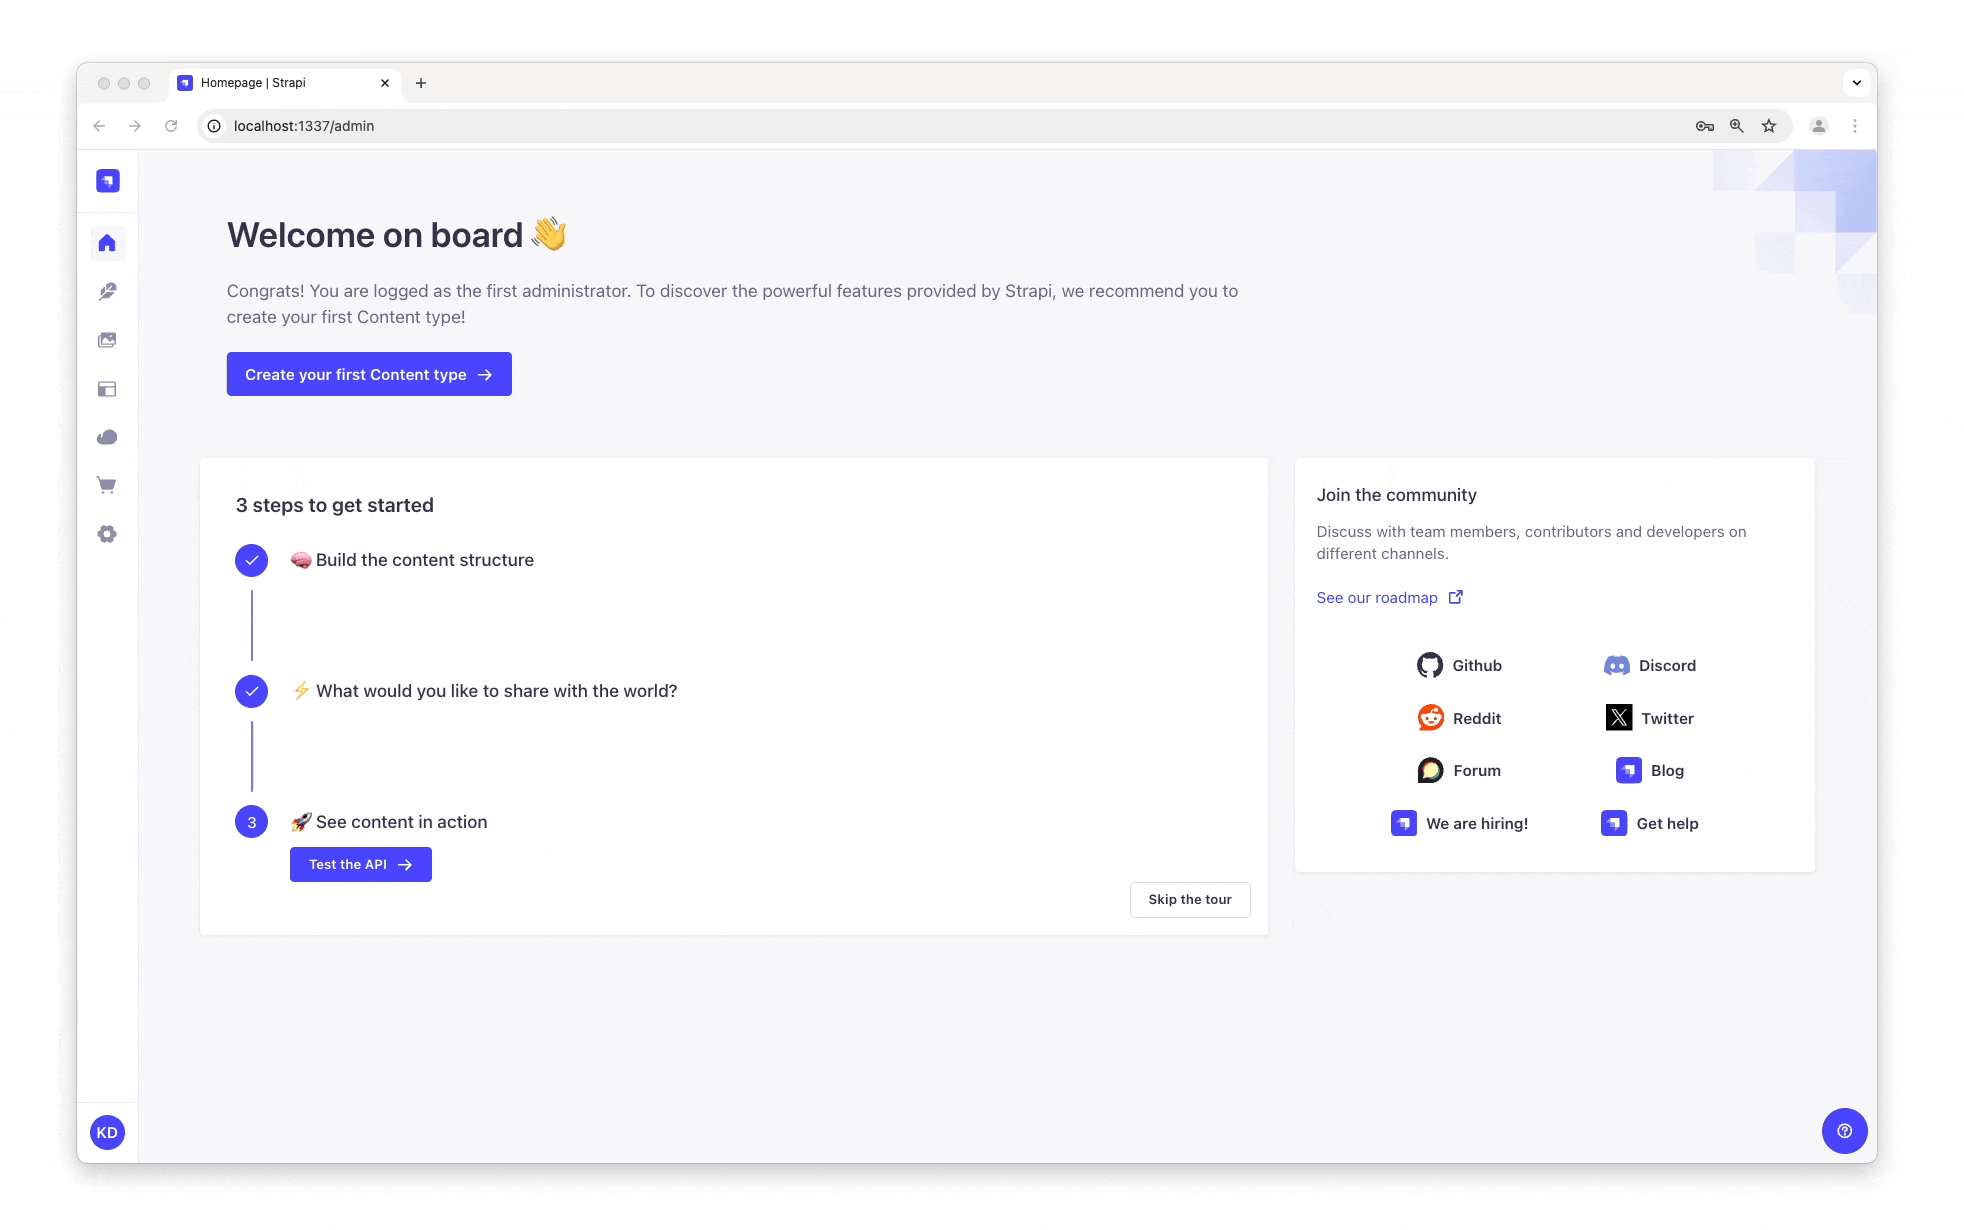
By completing the form, you create your own account. Once done, you become the first administrator user of this Strapi application. Welcome aboard, commander!
You now have access to the admin panel:
You have just created a new Strapi project! You can start playing with Strapi and discover the product by yourself using our User Guide, or proceed to part B below.
🛠 Part B: Build your data structure with the Content-type Builder
The installation script has just created an empty project. We will now guide you through creating a restaurants directory, inspired by our FoodAdvisor example application.
The admin panel of a local Strapi project runs at http://localhost:1337/admin. This is where you will spend most of your time creating and updating content.
First we will build a data structure for your content. This can only be done while in development mode, which is the default mode for projects that are created locally.
If the server is not already running, in your terminal, cd into the my-strapi-project folder and run npm run develop (or yarn develop) to launch it.
The Content-Type Builder helps you create your data structure. When creating an empty project with Strapi, this is where to get the party started!
Step 1: Create a "Restaurant" collection type
Step 1: Create a "Restaurant" collection type
Your restaurants directory will eventually include many restaurants, so we need to create a "Restaurant" collection type. Then we can describe the fields to display when adding a new restaurant entry:
- Click on the Create your first Content type button.
If it's not showing up, go to Content-Type Builder in the main navigation.
 - Click on Create new collection type.
- Type
Restaurantfor the Display name, and click Continue. - Click the Text field.
- Type
Namein the Name field. - Switch to the Advanced Settings tab, and check the Required field and the Unique field settings.
- Click on Add another field.
- Choose the Rich text (Blocks) field in the list.
- Type
Descriptionunder the Name field, then click Finish. - Finally, click Save and wait for Strapi to restart.
Once Strapi has restarted, "Restaurant" is listed under ![]() Content Manager > Collection types in the navigation. Wow, you have just created your very first content-type! It was so cool — let's create another one right now, just for pleasure.
Content Manager > Collection types in the navigation. Wow, you have just created your very first content-type! It was so cool — let's create another one right now, just for pleasure.
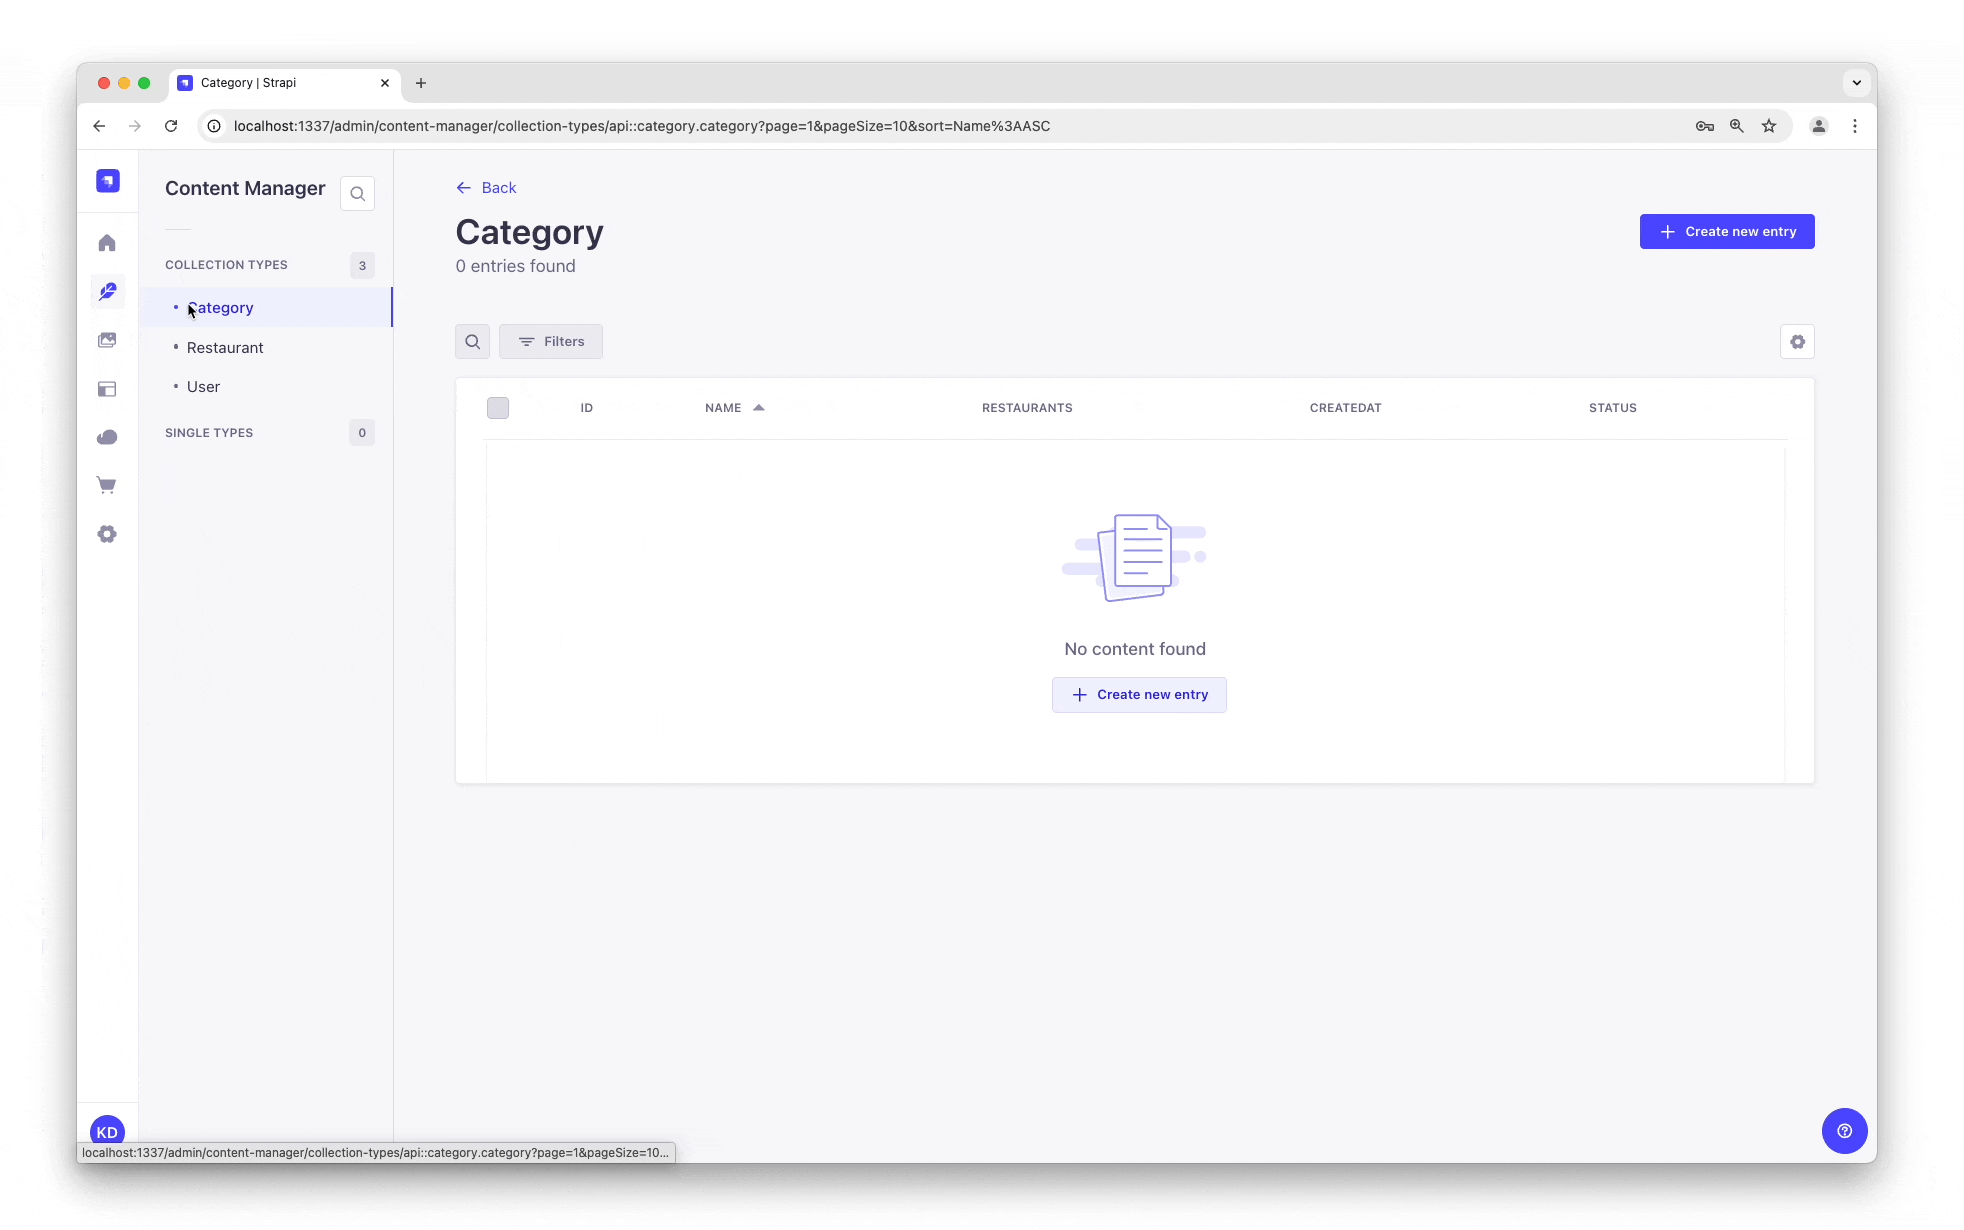
Step 2: Create a "Category" collection type
Step 2: Create a "Category" collection type
It would help getting a bit more organized if our restaurants directory had some categories. Let's create a "Category" collection type:
- Go to Content-type Builder in the main navigation.
- Click on Create new collection type.
- Type
Categoryfor the Display name, and click Continue. - Click the Text field.
- Type
Namein the Name field. - Switch to the Advanced Settings tab, and check the Required field and the Unique field settings.
- Click on Add another field.
- Choose the Relation field.
- In the center, select the icon that represents "many-to-many"
 . The text should read
 Categories has and belongs to many Restaurants.
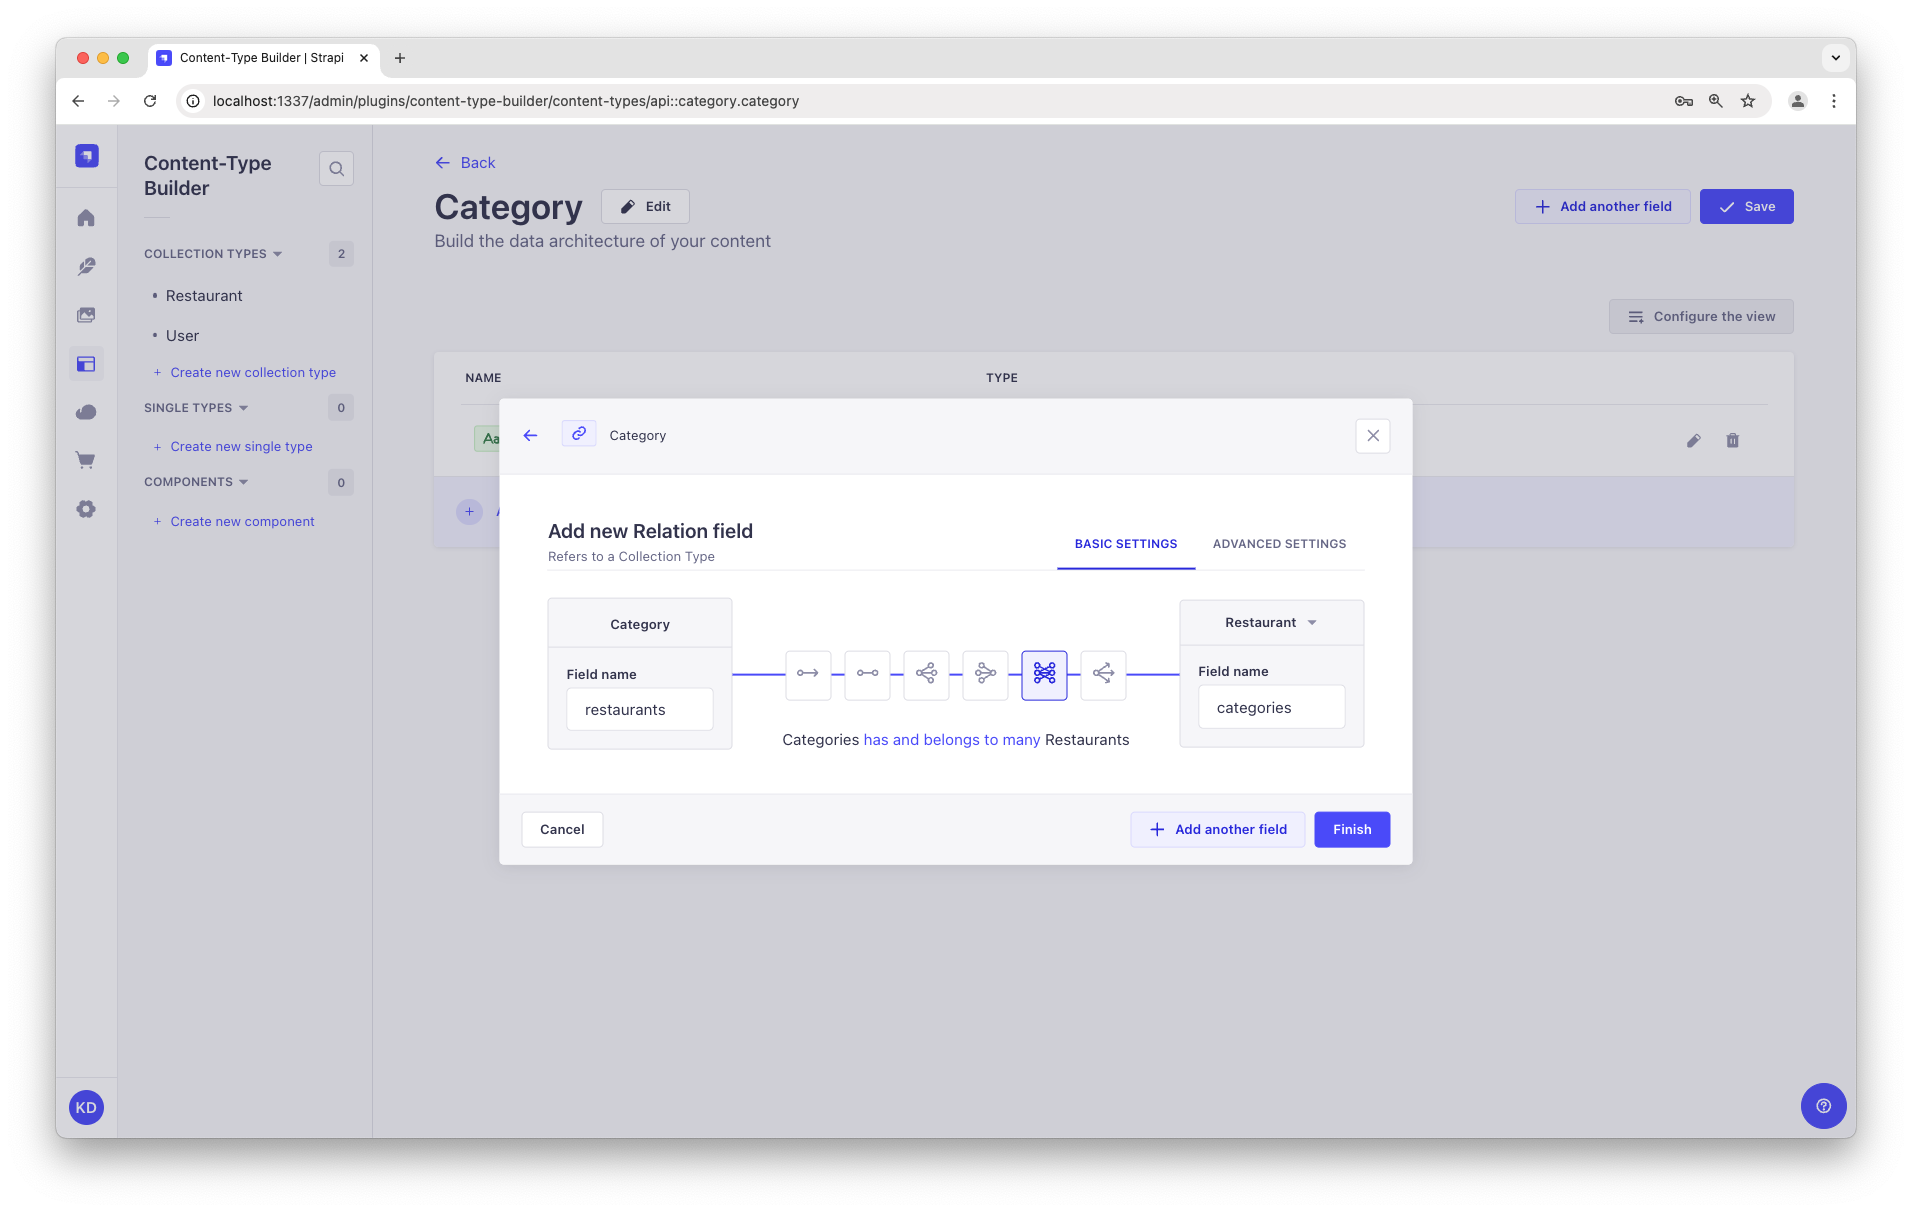
- Finally, click Finish, then the Save button, and wait for Strapi to restart.
You have just created a basic data structure for your Strapi project! You can keep on playing with the Content-Type Builder, or proceed to parts C and D below to discover Strapi Cloud and add actual content to your project.
☁️ Part C: Deploy to Strapi Cloud
Now that your beautiful first Strapi project is working locally, it's time for the world to see it live! The most straightforward way to host your project is to use Strapi Cloud: Deploying your project on Strapi Cloud is done with a single command! 🚀
To deploy your project on Strapi Cloud, in your terminal:
If the server for your local Strapi project is running, which should be the case if you followed this tutorial so far, press
Ctrl-Cto stop the server.Ensure you are in the folder of your Strapi project (if needed, run for instance
cd my-strapi-projectto reach this folder), and run the following command:- Yarn
- NPM
yarn strapi deploynpm run strapi deployAnswer questions in the terminal, giving your project a name (you can press Enter to keep the default name), choosing the recommended NodeJS version, and selecting the region closer to your current place:

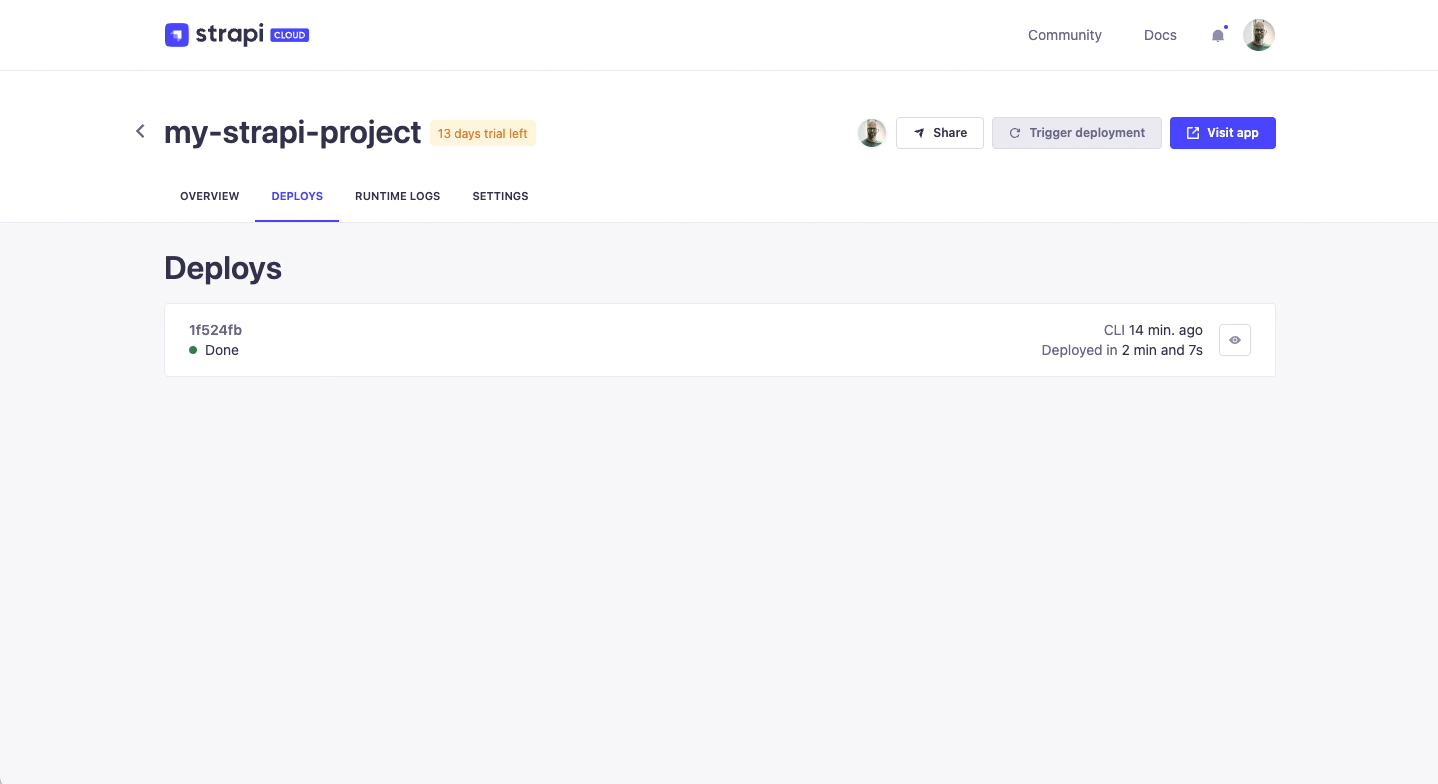
Within a few moments, your local project will be hosted on Strapi Cloud. 🚀
Once it's done, the terminal will provide you a clickable link that starts with https://cloud.strapi.io/projects. Click on the link, or copy and paste it in your browser address bar, to visit the page.
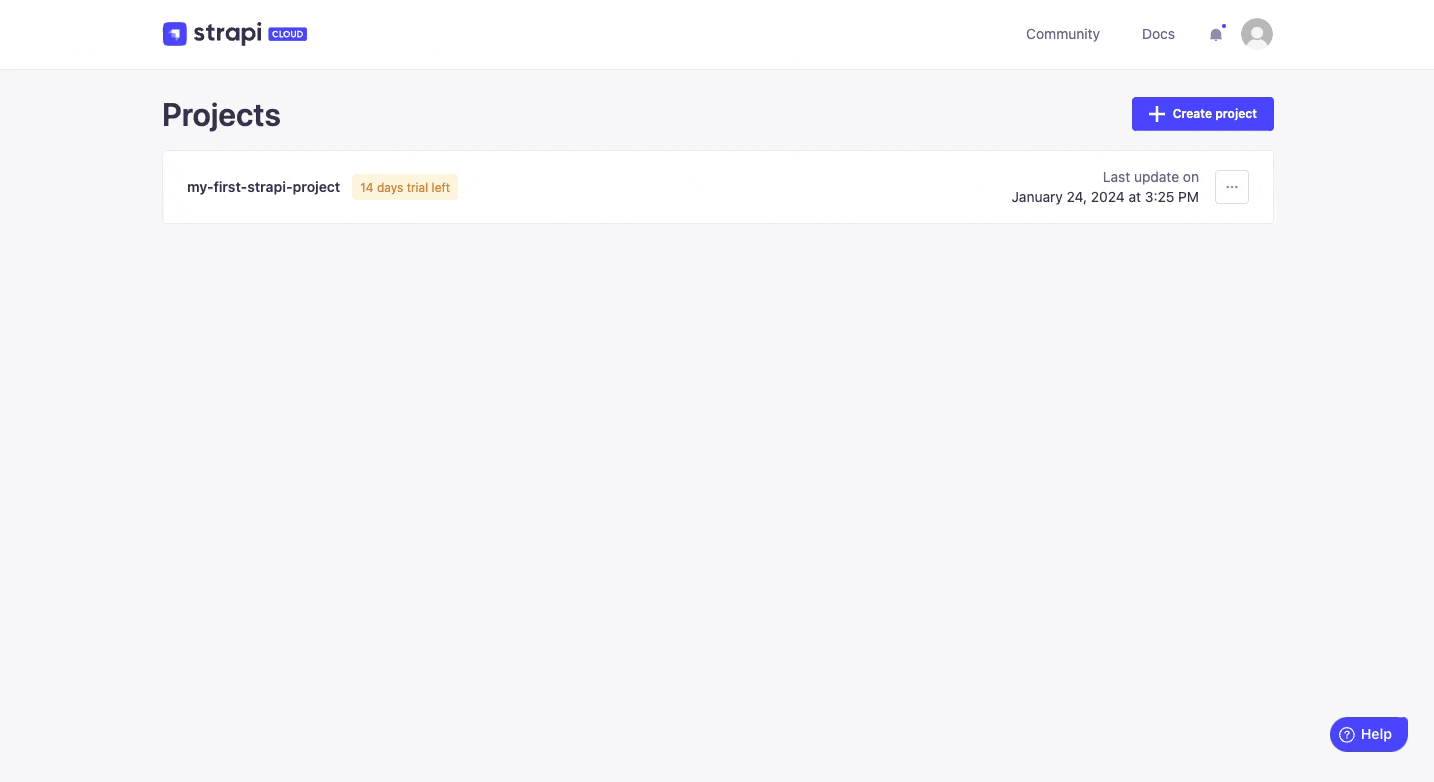
You will see the Strapi Cloud project we've just created, my-strapi-project, visible in the Strapi Cloud dashboard. Click the Visit app button in the top right corner to access your deployed Strapi project.
Now your project is hosted on Strapi Cloud and accessible online. Enjoy your 14-day free Strapi Cloud trial! You can learn more about Strapi Cloud by reading its dedicated documentation or proceed to part D to log in into your online Strapi project and add your first data from there.
Feel free to play with the Content-Type Builder even further and add more fields to your content-types or create new content-types. Anytime you make such changes, deploy them again on Strapi Cloud, by running the appropriate deploy command, and see your hosted project updated within a few minutes. Magical, isn't it? 🪄
📝 Part D: Add content to your Strapi Cloud project with the Content Manager
Now that we have created a basic data structure with 2 collection types, "Restaurant" and "Category", and deployed your project to Strapi Cloud, let's use the Cloud to actually add content by creating new entries.
Step 1: Log in to the admin panel of your new Strapi Cloud project
Step 1: Log in to the admin panel of your new Strapi Cloud project
Now that your Strapi Cloud project is created, let's log in into the project:
- From your Strapi Cloud dashboard, click the
my-strapi-projectproject. - Click the Visit app button.
- In the new page that opens, complete the form to create the first administrator user of this Strapi Cloud project.
Logged in into our first Strapi Cloud project, we will now add data from there.
ℹ️ Additional information and tips about users and Strapi Cloud projects:
The databases for your Strapi Cloud project and your local project are different. This means that data is not automatically transferred from your local project to Strapi Cloud. This includes users that you previously created locally. That's why you are invited to create a new administrator account when logging in to your Strapi Cloud project for the first time.
Any project hosted on Strapi Cloud is accessible from its own URL, something like https://my-strapi-project-name.strapiapp.com. To access the admin panel of your online project, simply add /admin to the URL, for instance as in https://my-strapi-project-name.strapiapp.com/admin. URLs can be found in your Strapi Cloud dashboard and you can also directly access your Strapi Cloud projects from there by clicking on the name of your project then on the Visit app button.
Step 2: Create an entry for the "Restaurant" collection type
Step 2: Create an entry for the "Restaurant" collection type
- Go to
 Content Manager > Collection types - Restaurant in the navigation.
 - Click on Create new entry.
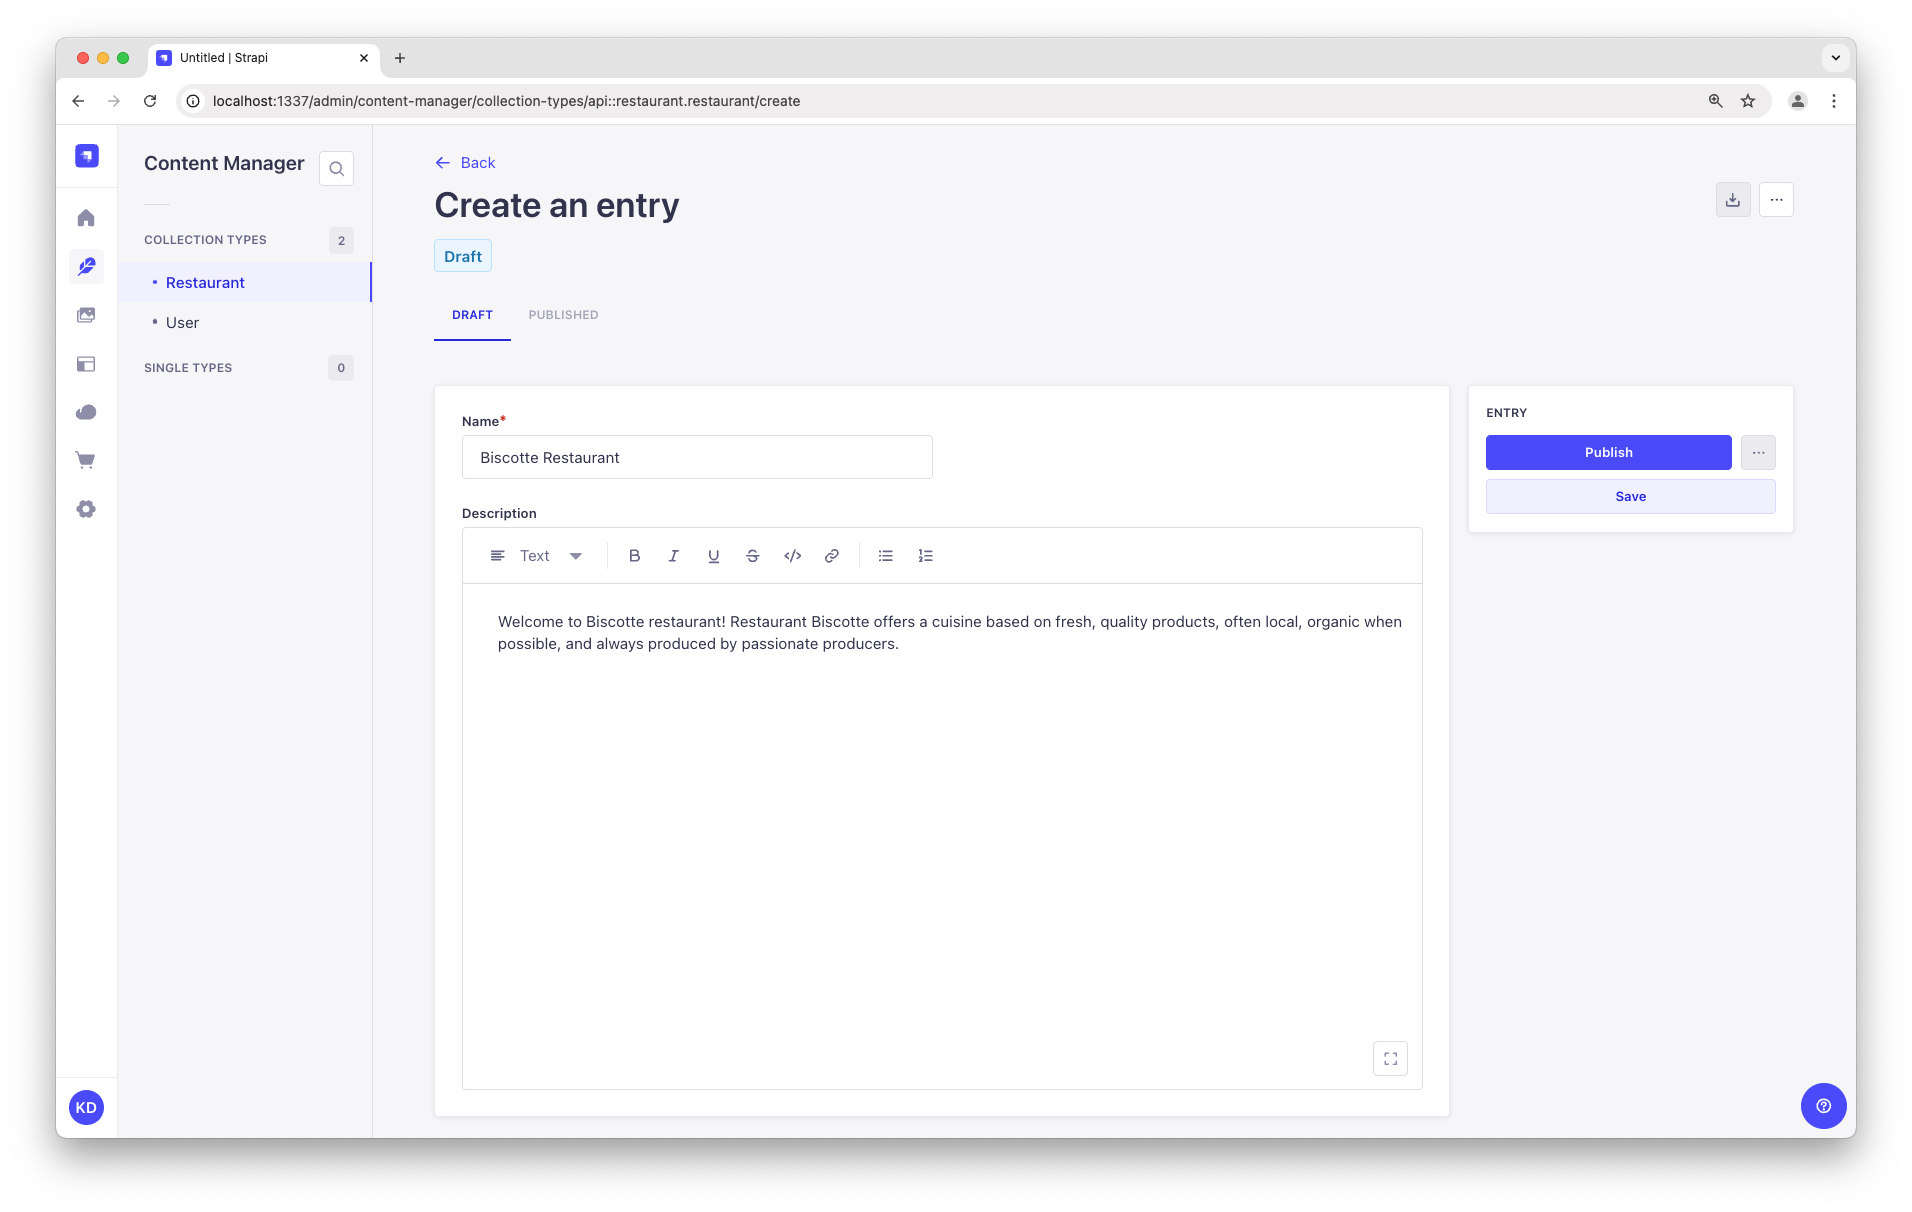
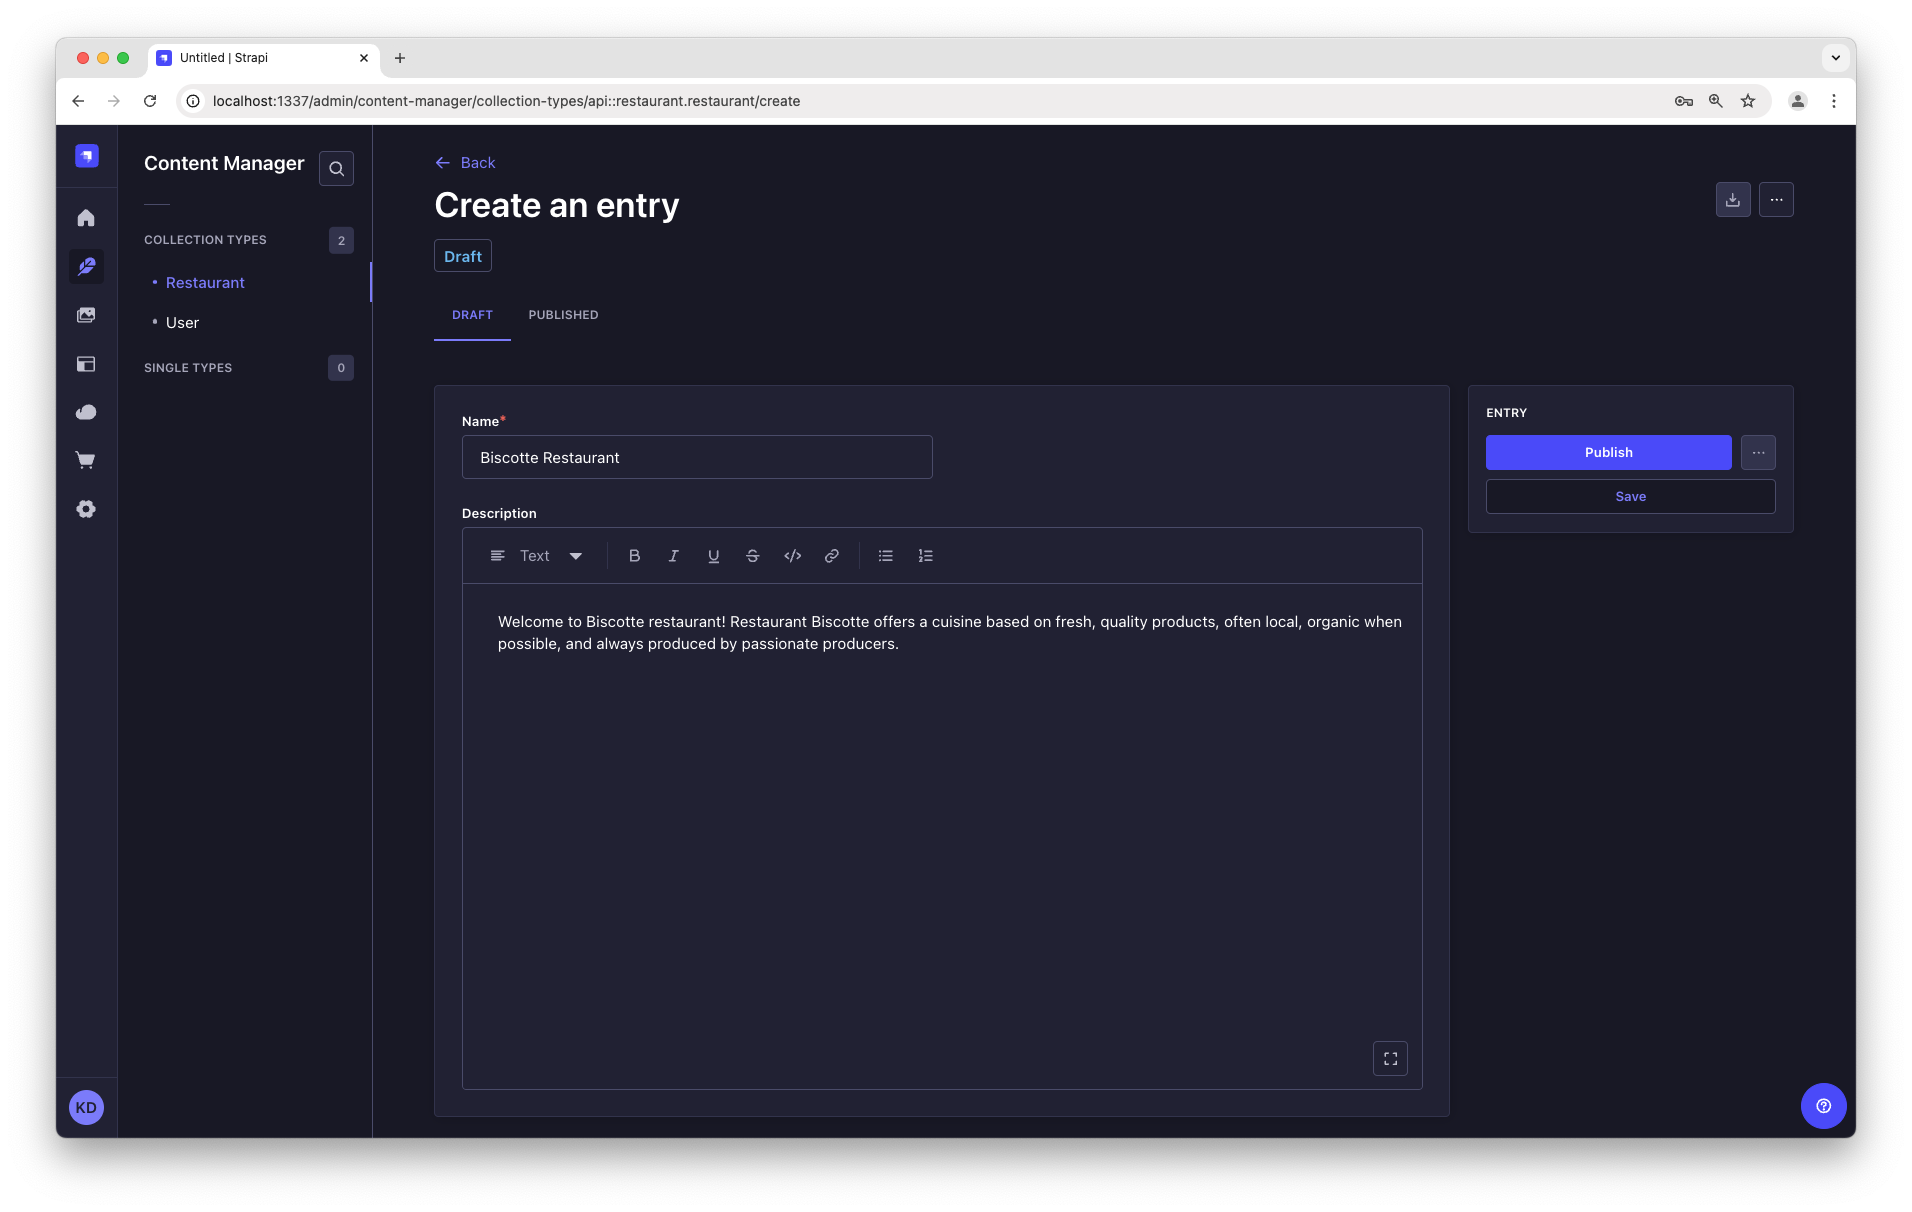
- Type the name of your favorite local restaurant in the Name field. Let's say it's
Biscotte Restaurant. - In the Description field, write a few words about it. If you're lacking some inspiration, you can use
Welcome to Biscotte restaurant! Restaurant Biscotte offers a cuisine based on fresh, quality products, often local, organic when possible, and always produced by passionate producers. - Click Save.
The restaurant is now listed in the Collection types - Restaurant view of the ![]() Content Manager.
Content Manager.
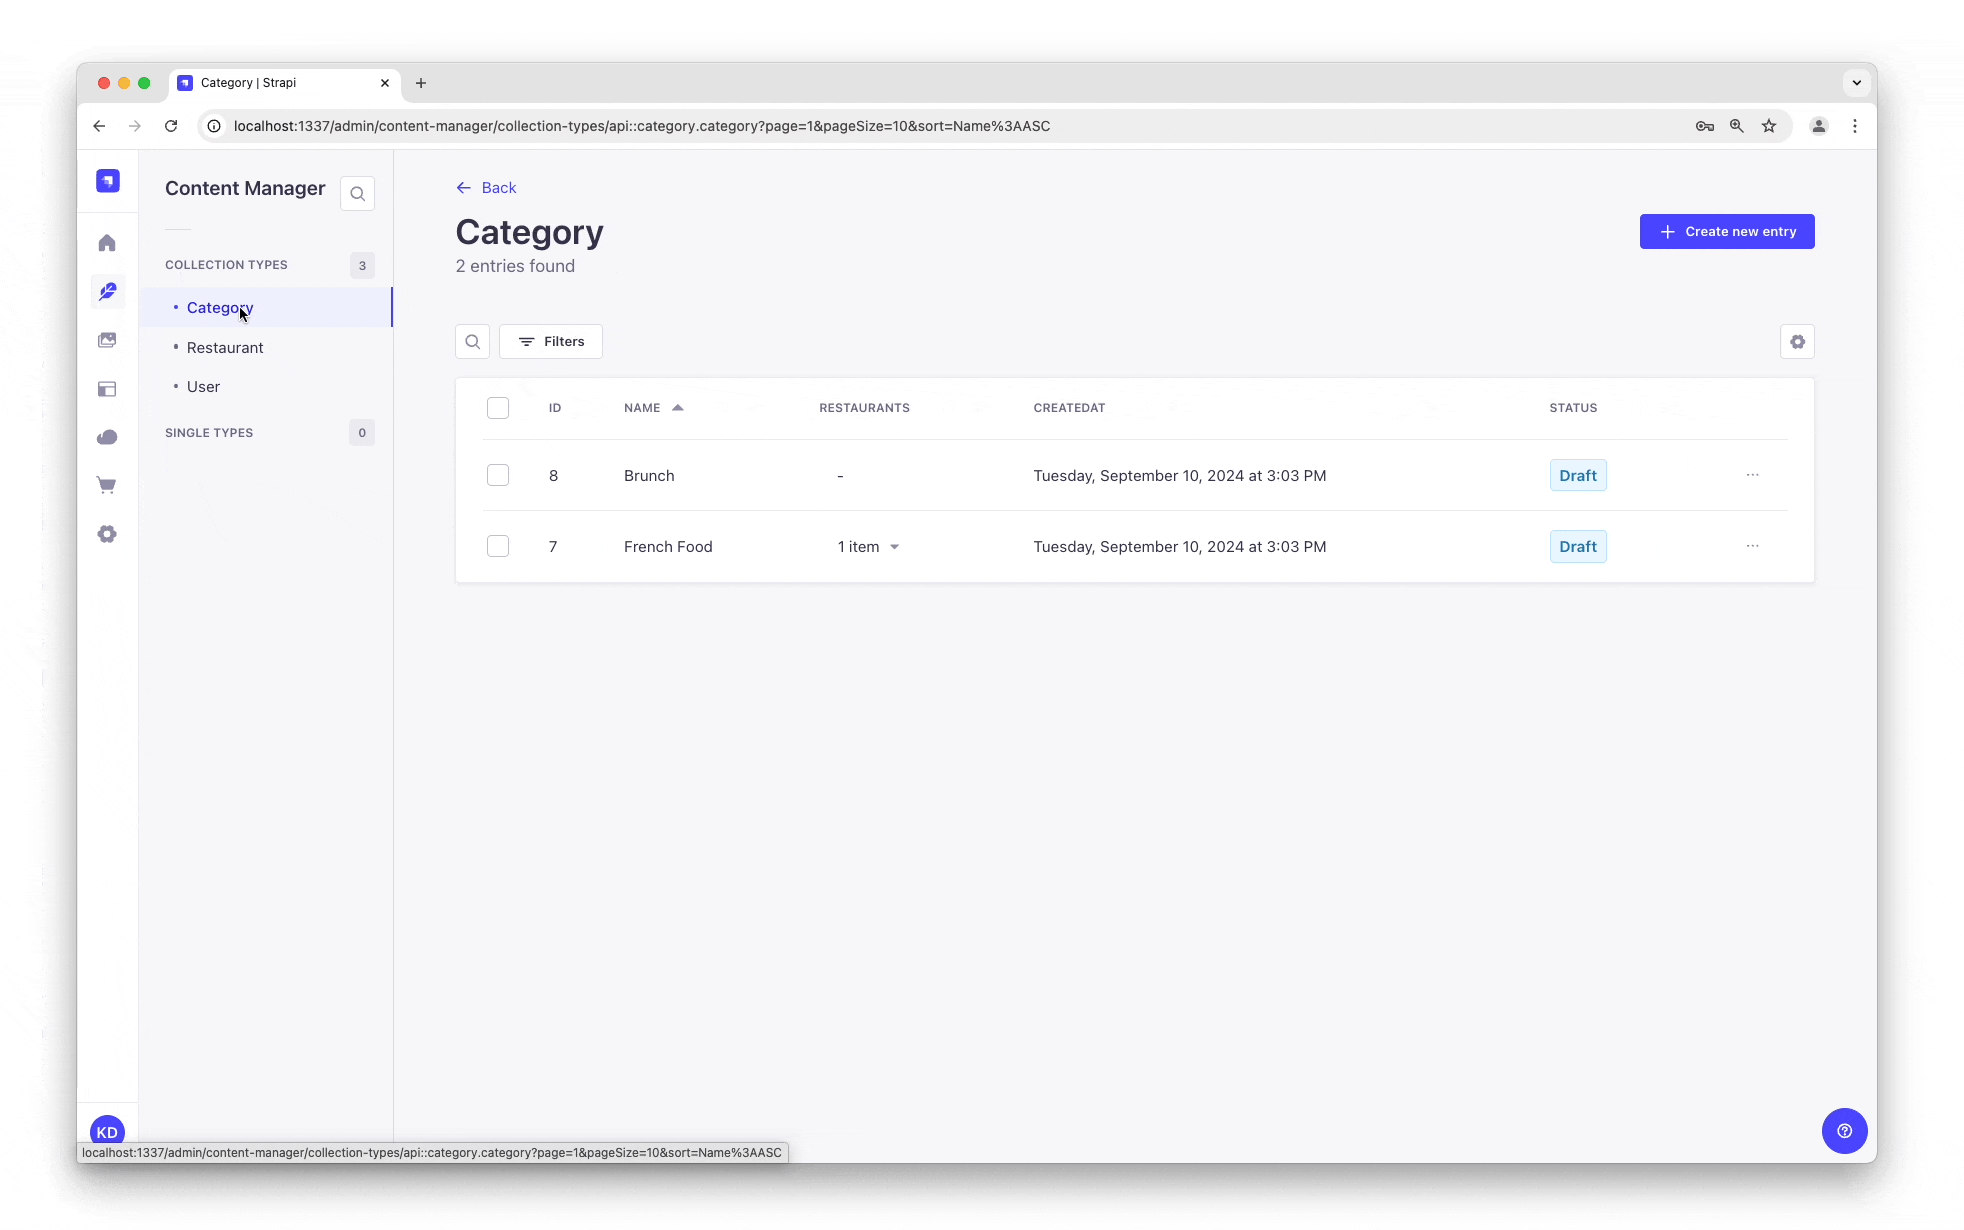
Step 3: Add Categories
Step 3: Add Categories
Let's go to ![]() Content Manager > Collection types - Category and create 2 categories:
Content Manager > Collection types - Category and create 2 categories:
- Click on Create new entry.
- Type
French Foodin the Name field. - Click Save.
- Go back to Collection types - Category, then click again on Create new entry.
- Type
Brunchin the Name field, then click Save.
The "French Food" and "Brunch" categories are now listed in the Collection types - Category view of the ![]() Content Manager.
Content Manager.
Now, we will add a category to a restaurant:
- Go to Content Manager > Collection types - Restaurant in the navigation, and click on "Biscotte Restaurant".
- In the Categories drop-down list at the bottom of the page, select "French Food". Scroll back to the top of the page and click Save.
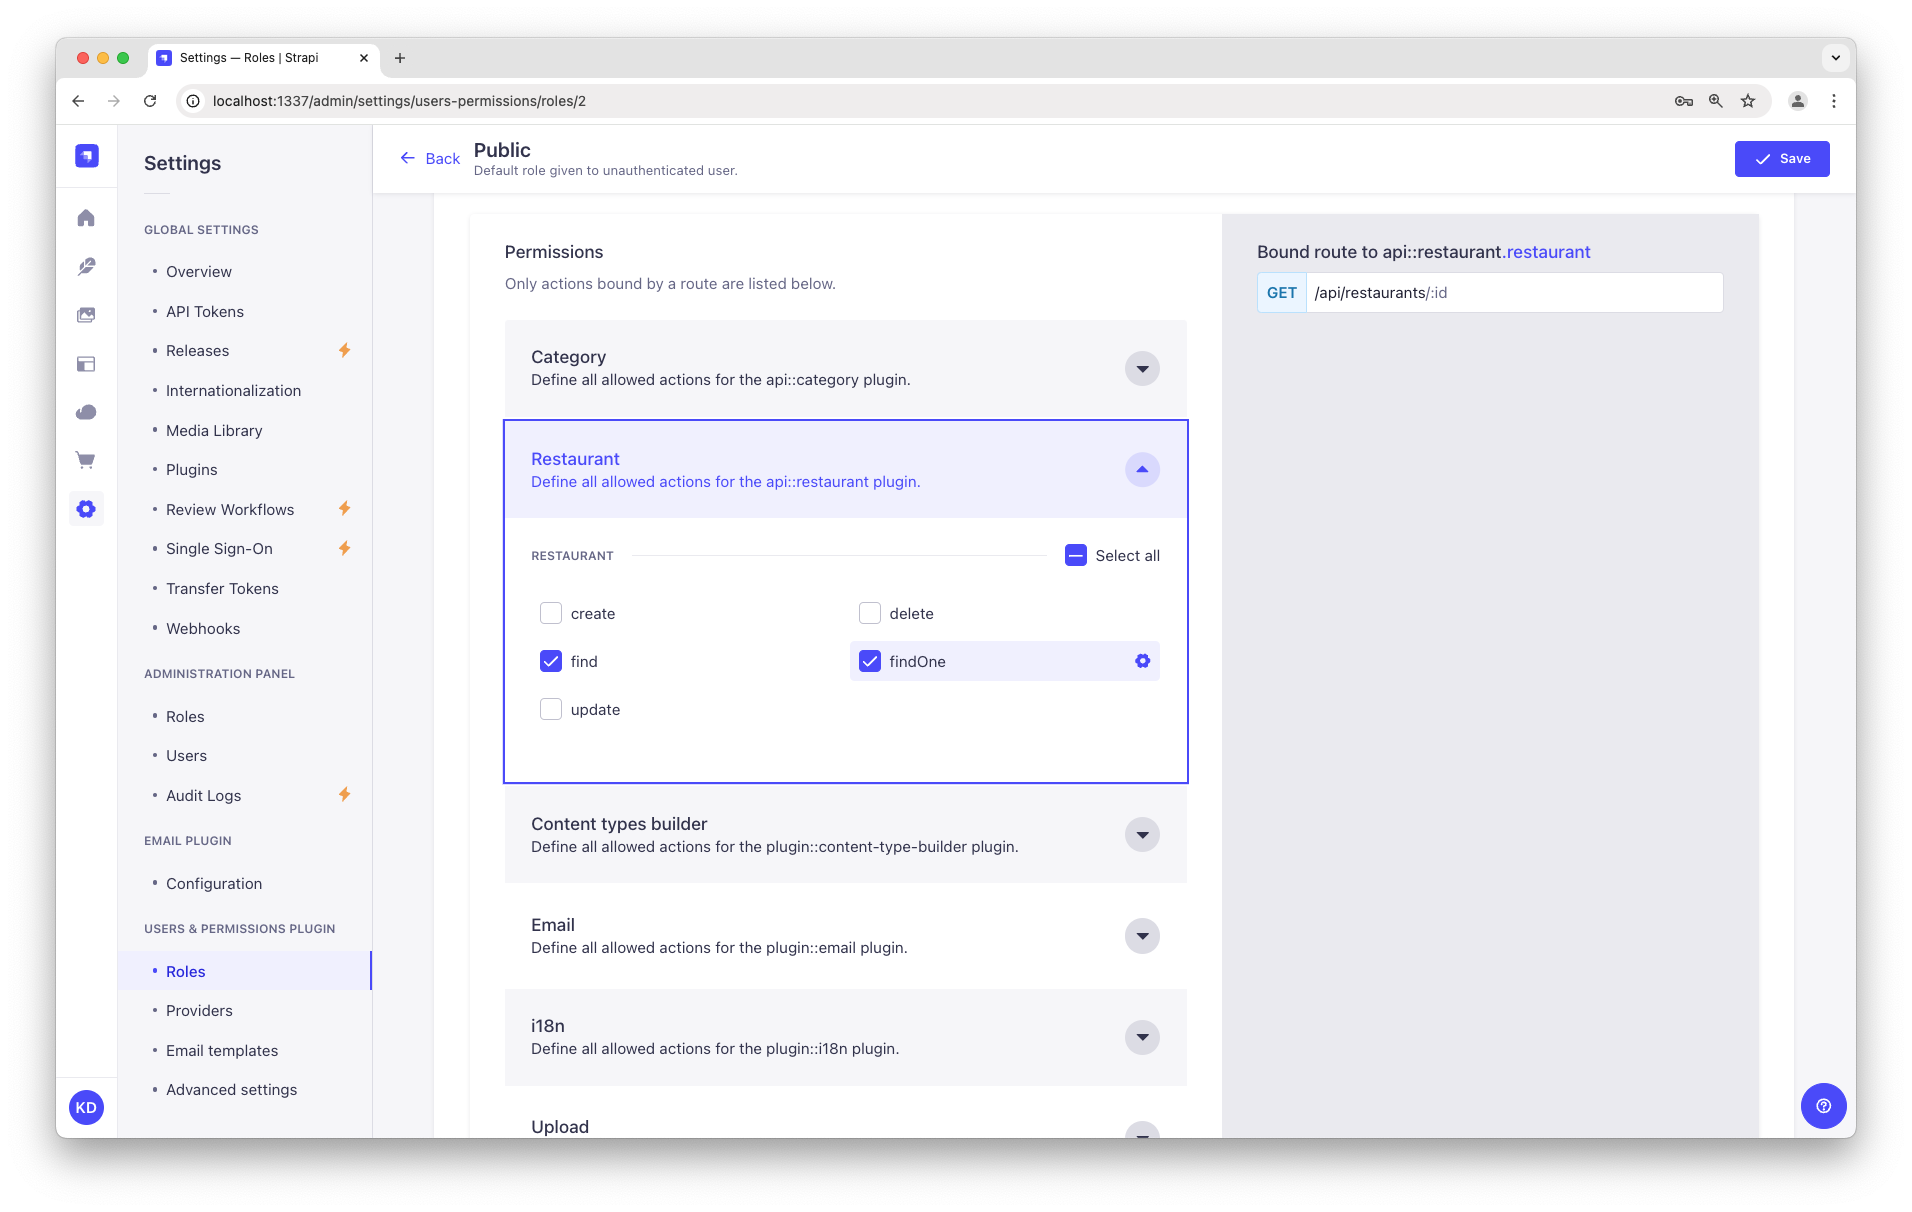
Step 4: Set Roles & Permissions
Step 4: Set Roles & Permissions
We have just added a restaurant and 2 categories. We now have enough content to consume (pun intended). But first, we need to make sure that the content is publicly accessible through the API:
- Click on
 Settings at the bottom of the main navigation.
 - Under Users & Permissions Plugin, choose Roles.
- Click the Public role.
- Scroll down under Permissions.
- In the Permissions tab, find Restaurant and click on it.
- Click the checkboxes next to find and findOne.
- Repeat with Category: click the checkboxes next to find and findOne.
- Finally, click Save.

Step 5: Publish the content
Step 5: Publish the content
By default, any content you create is saved as a draft. Let's publish our categories and restaurant.
First, navigate to ![]() Content Manager > Collection types - Category. From there:
Content Manager > Collection types - Category. From there:
- Click the "Brunch" entry.
- On the next screen, click Publish.
- In the Confirmation window, click Yes, publish.
Then, go back to the Categories list and repeat for the "French Food" category.
Finally, to publish your favorite restaurant, go to ![]() Content Manager > Collection types - Restaurant, click the "Biscotte Restaurant" entry, and Publish it.
Content Manager > Collection types - Restaurant, click the "Biscotte Restaurant" entry, and Publish it.
Step 6: Use the API
Step 6: Use the API
OK dear gourmet, we have just finished creating our content and making it accessible through the API. You can give yourself a pat on the back — but you have yet to see the final result of your hard work.
There you are: the list of restaurants should be accessible by visting the /api/restaurants path of your Strapi Cloud project URL (e.g., https://beautiful-first-strapi-project.strapiapp.com/api/restaurants).
Try it now! The result should be similar to the example response below 👇.
Click me to view an example of API response:
{
  "data": [
    {
      "id": 3,
      "documentId": "wf7m1n3g8g22yr5k50hsryhk",
      "Name": "Biscotte Restaurant",
      "Description": [
        {
          "type": "paragraph",
          "children": [
            {
              "type": "text",
              "text": "Welcome to Biscotte restaurant! Restaurant Biscotte offers a cuisine based on fresh, quality products, often local, organic when possible, and always produced by passionate producers."
            }
          ]
        }
      ],
      "createdAt": "2024-09-10T12:49:32.350Z",
      "updatedAt": "2024-09-10T13:14:18.275Z",
      "publishedAt": "2024-09-10T13:14:18.280Z",
      "locale": null
    }
  ],
  "meta": {
    "pagination": {
      "page": 1,
      "pageSize": 25,
      "pageCount": 1,
      "total": 1
    }
  }
}
Now your content is created, published, and you have permissions to request it through the API. Keep on creating amazing content!
The databases for your Strapi Cloud project and your local project are different. This means that data is not automatically synchronized between your Strapi Cloud and local projects. You can use the data management system to transfer data between projects.
⏩ What to do next?
Now that you know the basics of creating and publishing content with Strapi, we encourage you to explore and dig deeper into some Strapi features:
- 👉 learn how to use Strapi's REST API to query the content,
- 👉 learn more about Strapi features by browsing the User Guide,
- 👉 learn more about Strapi Cloud projects by reading the Cloud Documentation,
- 👉 and customize your Strapi back end and admin panel for advanced use cases.